Install and update guide
Step by step, with annotated screenshots
This guide walks through installing Blazor Data Orchestrator (BDO) into your own Azure subscription with BlazorData.net, and updating it to a newer release later. The numbered callouts on each screenshot match the numbered notes under it.
Before you start
-
A Microsoft account that can reach your Azure subscription, with enough rights to give BlazorData.net's
deployer access. Work, school and personal Microsoft accounts are supported.
- For a new resource group, BlazorData.net creates it as you, so you need Owner on the subscription, or Contributor plus User Access Administrator or Role Based Access Control Administrator there.
- For an existing resource group, you need Owner, User Access Administrator or Role Based Access Control Administrator on it, directly or inherited from the subscription. This applies to every resource group the installation uses, including the groups of existing resources you reuse.
- An Azure region where your subscription may create Azure SQL. Many subscription types are restricted in busy regions such as East US and East US 2; pre-flight tells you before anything is created.
- About 30 minutes for a first installation, most of it Azure creating the Container Apps environment. An update that only replaces the container images takes about 5 minutes.
1. Sign in
Signing in for the first time creates your BlazorData.net account and starts a 30-day free trial.
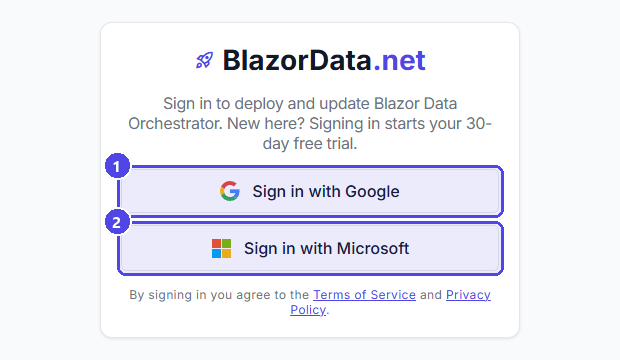
- Sign in with a Google account.
- Or sign in with a Microsoft account. This is only your BlazorData.net sign-in; you connect Azure separately in the next steps.
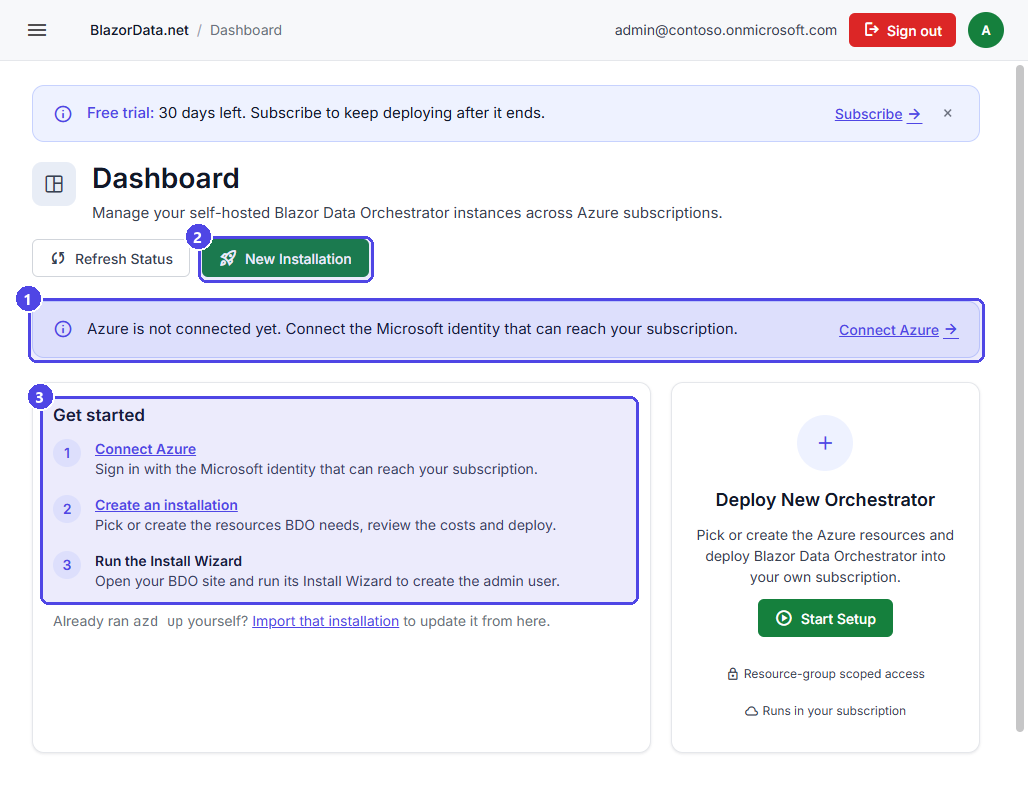
- Until Azure is connected, the dashboard says so. Connect Azure opens the Azure connection page.
- New Installation starts the installation wizard.
- The Get started checklist shows the three steps: connect Azure, create an installation, and run BDO's Install Wizard.
2. Connect Azure
On Azure connection, click Connect Azure and sign in with the Microsoft account that can reach your subscription. BlazorData.net reads your subscriptions with it, and later uses it to give its deployer app access to the resource group you choose.
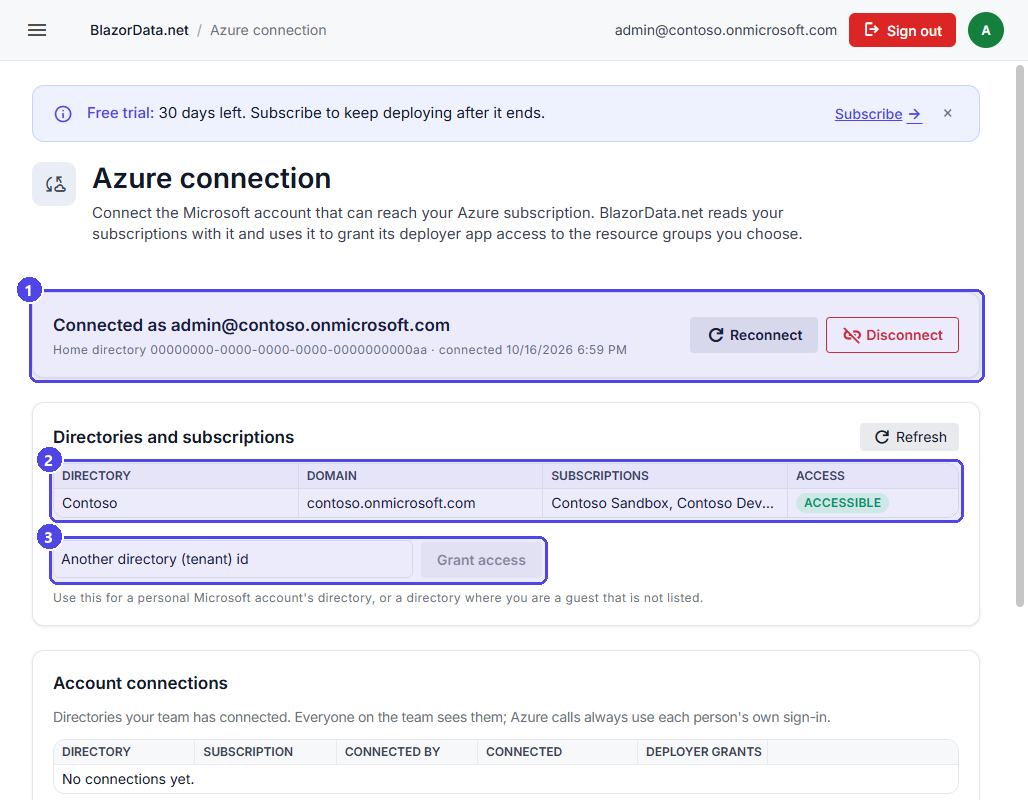
- The Microsoft account that is connected. Reconnect switches to another account; Disconnect removes the connection.
- The directories (tenants) and subscriptions this account can reach.
- For a directory where you are a guest, or a personal Microsoft account's directory, enter its tenant id and click Grant access.
Finish the Microsoft sign-in within 15 minutes of clicking Connect Azure. A sign-in that takes longer is rejected; just click Connect Azure again.
3. Create an installation
Click New installation. The wizard has 12 steps and saves your choices after each one, so you can close it and continue later from Installations.
Step 1: Azure
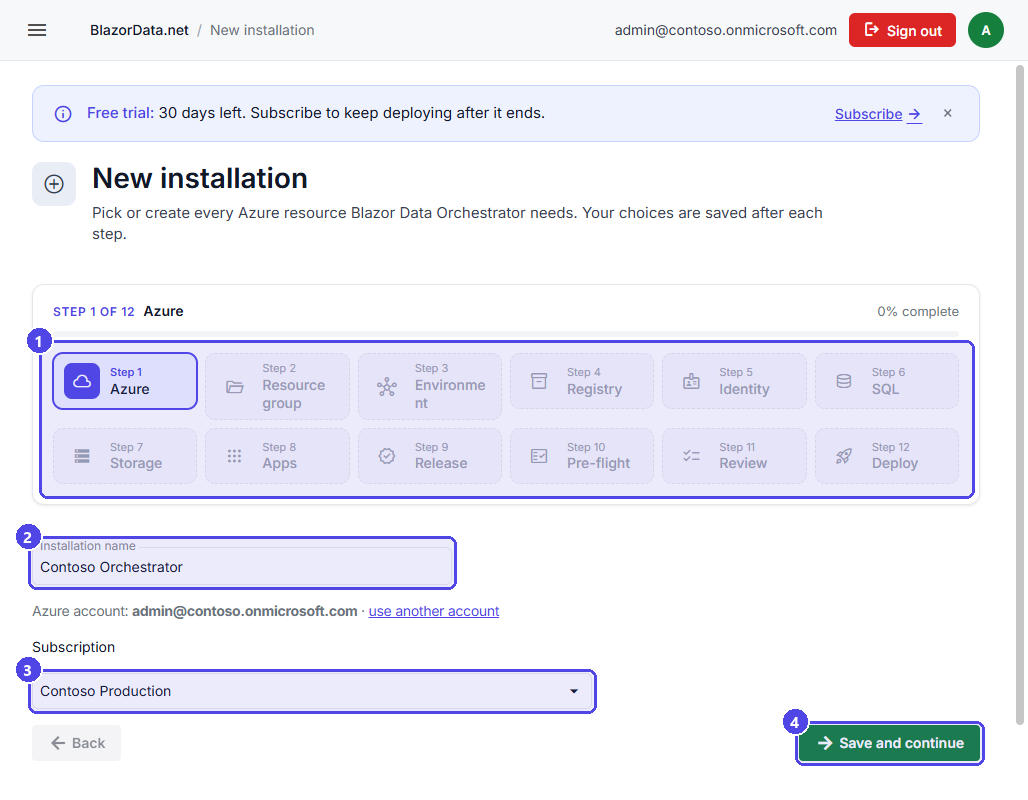
- The 12 steps. Completed steps show a check mark; click one to go back to it.
- A name for this installation, shown in your installation list.
- The Azure subscription to deploy into, from the connected account.
- Save and continue saves the draft and moves to the next step.
Step 2: Resource group and region
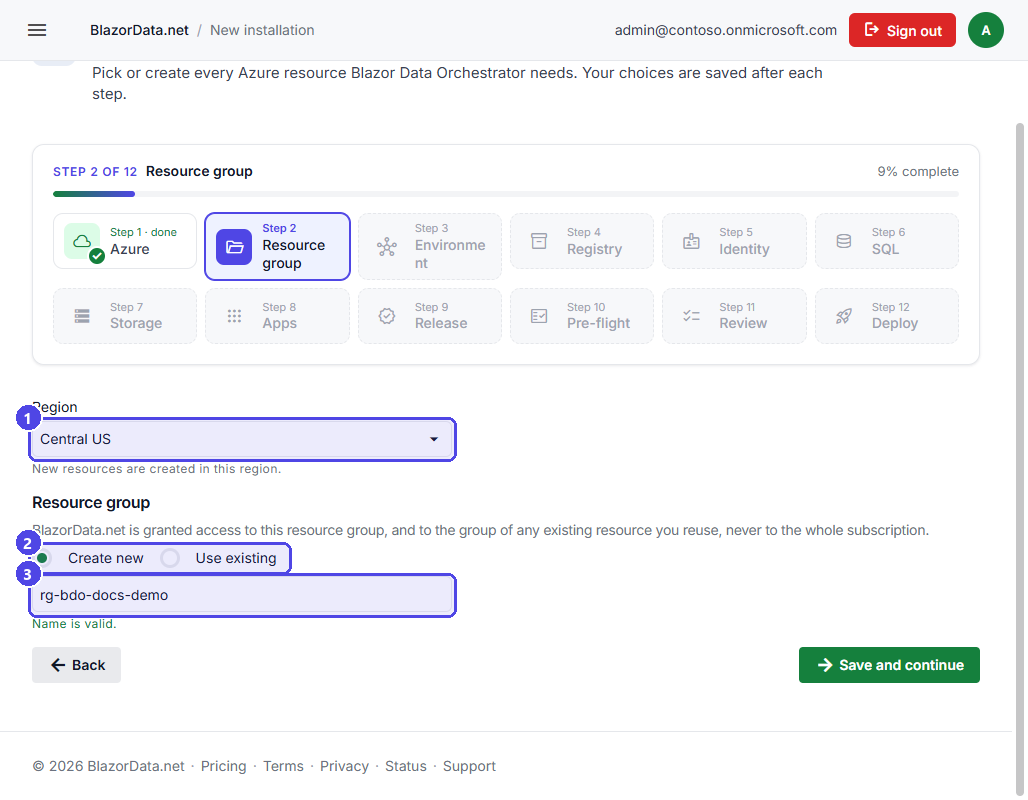
- The region where new resources are created. Pre-flight later checks that your subscription may create Azure SQL here.
- Create a new resource group, or use an existing one.
- The resource group's name. BlazorData.net gets access to this resource group, and to the group of any existing resource you reuse in steps 3 to 8, never to the whole subscription.
Steps 3 to 8: Azure resources
Steps 3 to 8 work the same way for each resource BDO needs: the Container Apps environment, container registry, managed identity, Azure SQL server and database, storage account, and the names of the three container apps.
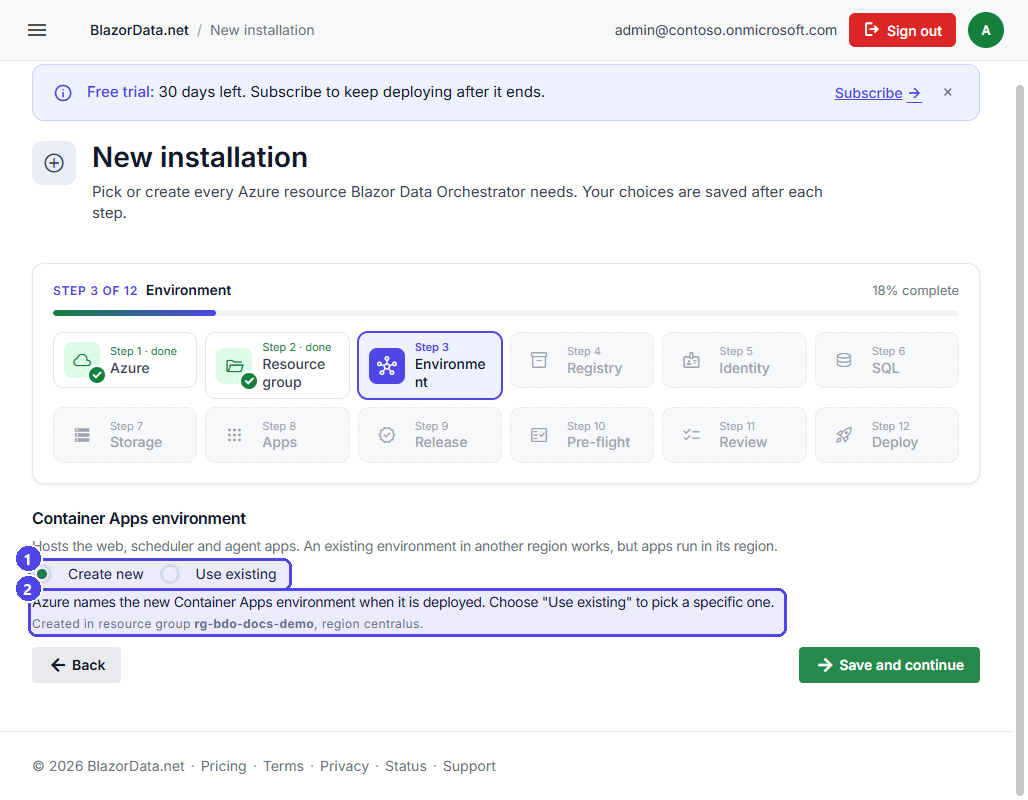
- Create new lets the deployment create the resource; Use existing lets you pick one you already have. An existing resource may be in another resource group; the deployer then gets access to that group too.
- New resources are named by Azure when they are deployed, so their names are always valid and available.
Step 9: Release
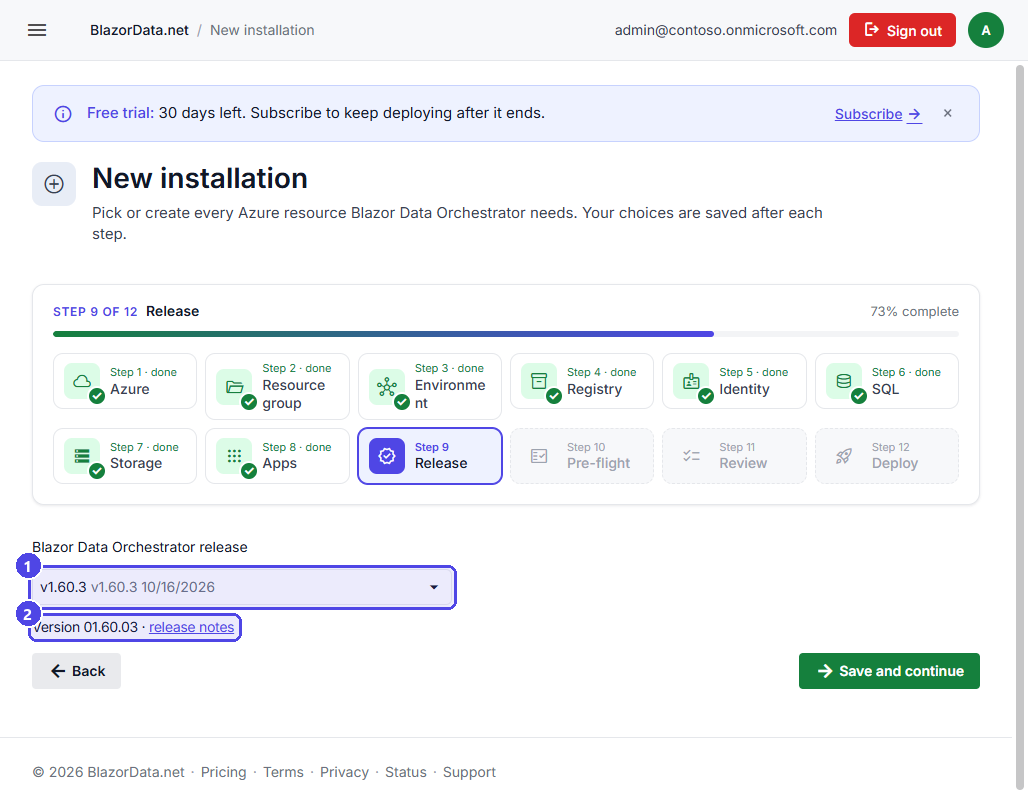
- The approved BDO releases, newest first. Only releases an administrator has approved are offered.
- The release notes on GitHub.
Step 10: Pre-flight
Pre-flight checks everything that would make the deployment fail before any Azure resource is created: your BlazorData.net subscription, your Azure permissions, registered resource providers, region availability, resource names, quotas and the release.
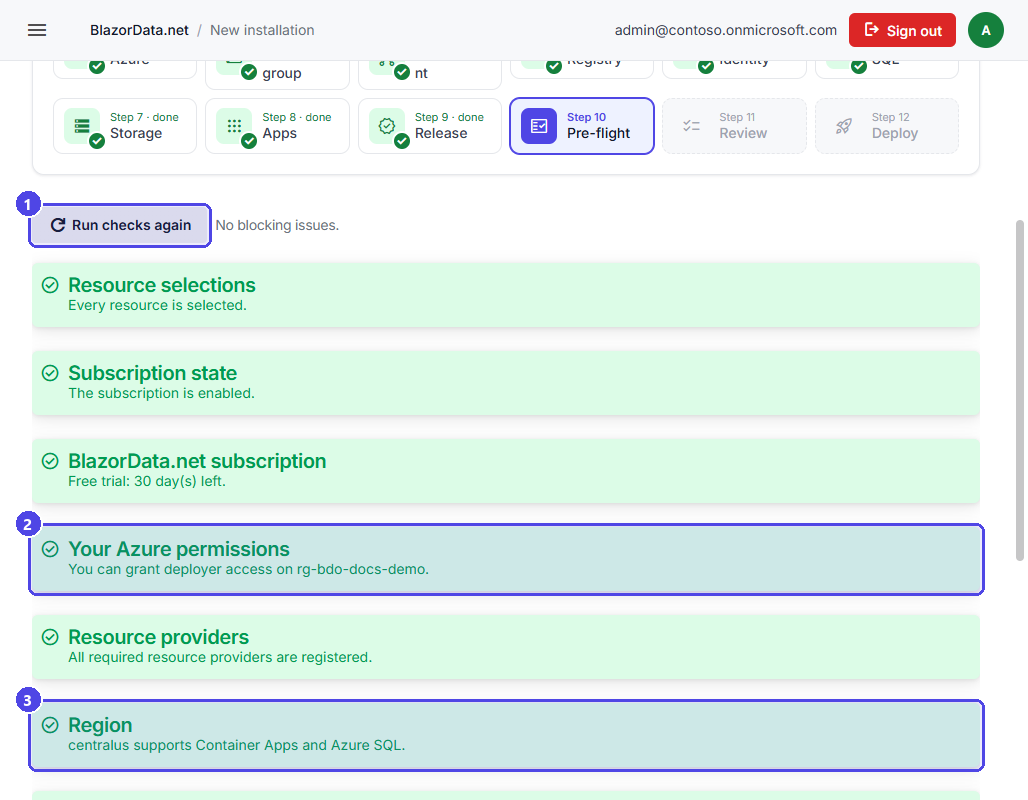
- Run checks again repeats the checks, for example after you fixed something in Azure.
- Whether your Azure account may give the deployer app access to the resource group.
- Whether the region offers Container Apps and, for your subscription, Azure SQL.
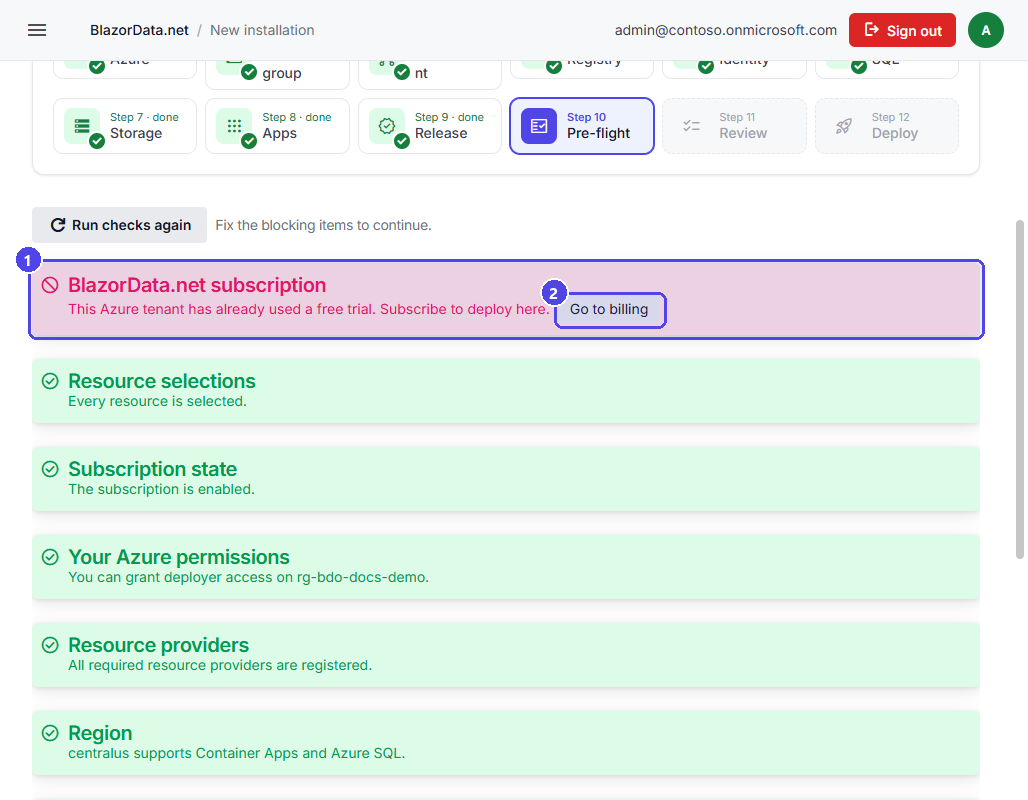
- A blocking item (red) must be fixed before you can continue; warnings (yellow) do not block.
- Many items carry a button for the fix, such as Go to billing or Register now for a resource provider.
Step 11: Review
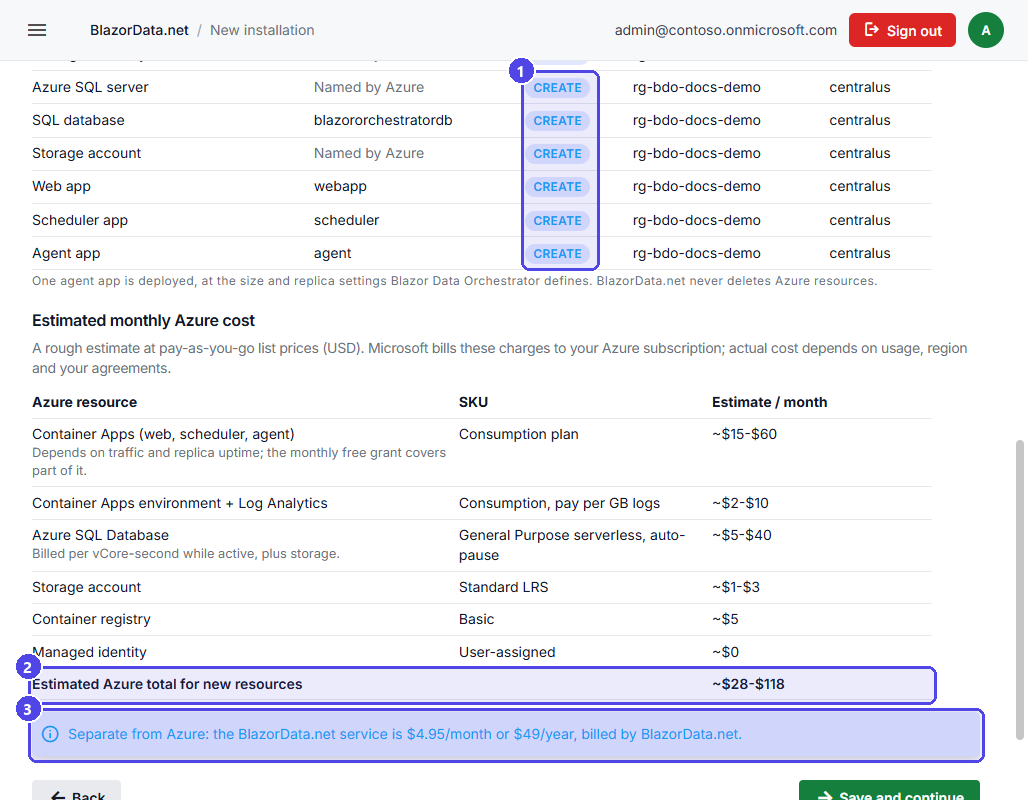
- What will happen to each resource: CREATE, or USE for an existing one.
- The estimated monthly Azure cost of the new resources, at pay-as-you-go list prices. Microsoft bills this to your subscription.
- The BlazorData.net service fee, billed separately.
Step 12: Grant access and deploy
BlazorData.net deploys with its own app, the BlazorData Deployer. Before the first deployment, you give it access to the resource group.
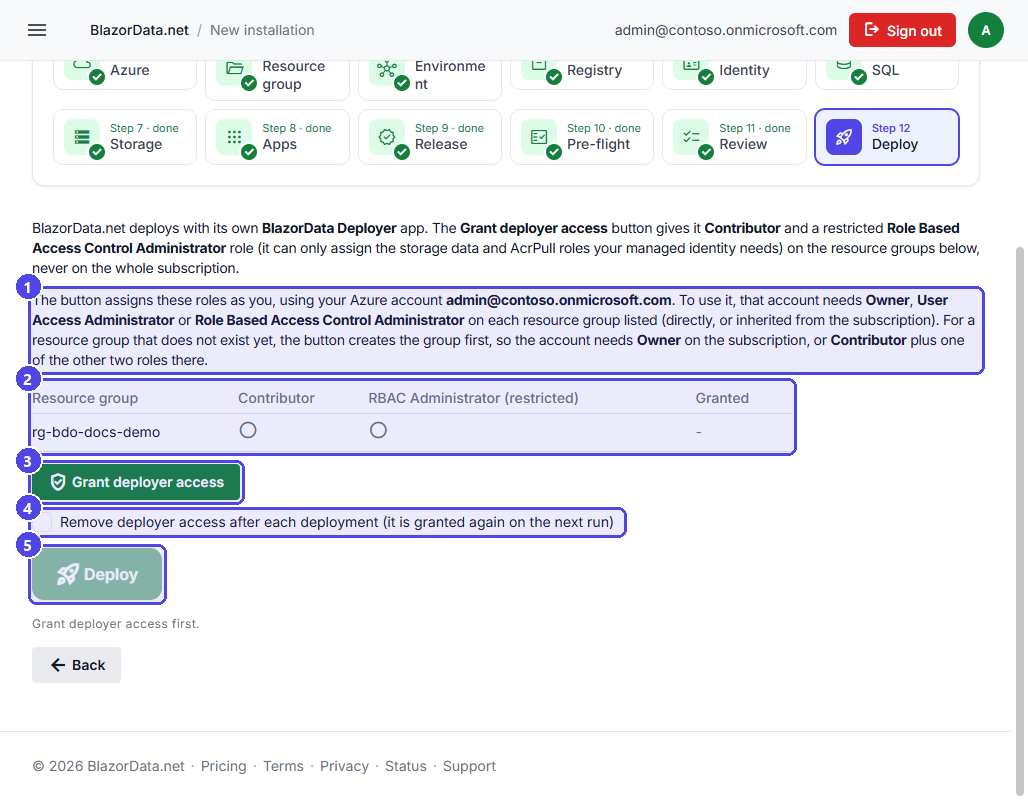
- The roles your own Azure account needs to grant access: Owner, User Access Administrator or Role Based Access Control Administrator on each listed resource group. For a group that does not exist yet: Owner on the subscription, or Contributor plus one of the other two roles there, because the group is created first.
- Every resource group the deployer gets access to: the installation's group and the group of any existing resource you reuse. On each, it gets Contributor and a restricted Role Based Access Control Administrator that may only assign the storage data and AcrPull roles your managed identity needs.
- Grant deployer access creates the installation's resource group if it is new, and assigns the two roles on every listed group, as you.
- Optionally remove the deployer's access after each deployment; it is granted again before the next one.
- Deploy stays disabled until access is granted.
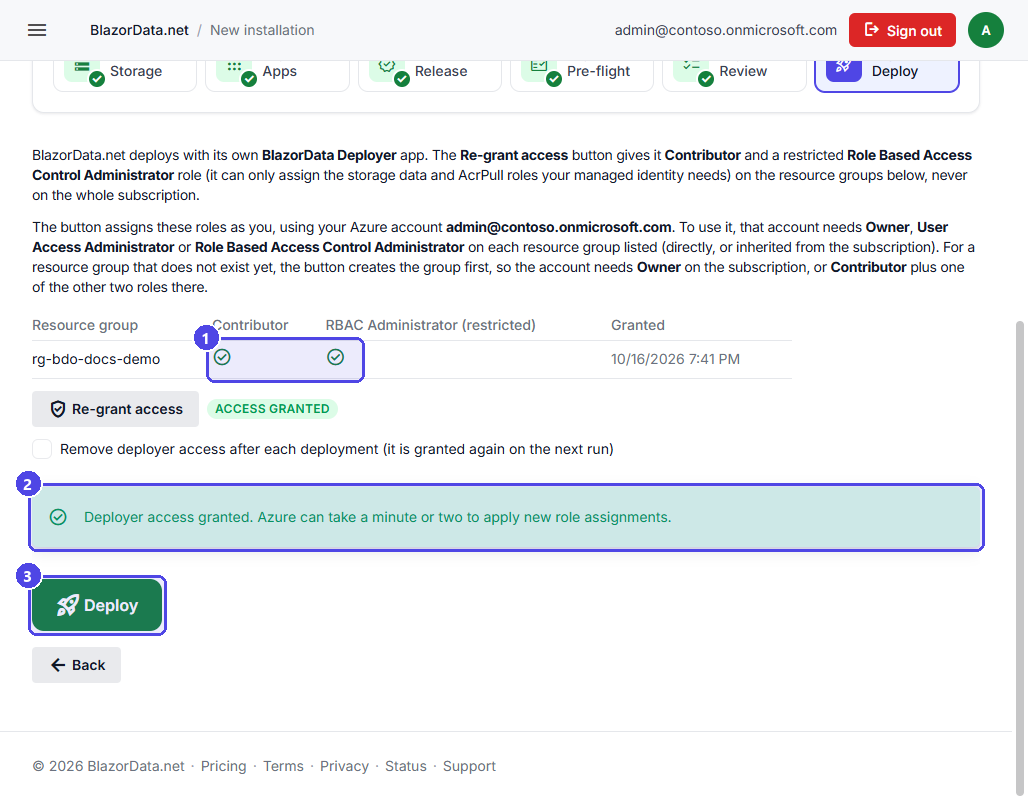
- Both roles are granted on the resource group.
- Azure can take a minute or two to apply new role assignments; the deployment waits and retries if needed.
- Deploy queues the installation and opens its progress page.
4. Watch the deployment
The deployment page updates live. You can close it and come back later; the deployment runs on BlazorData.net's servers, not in your browser.
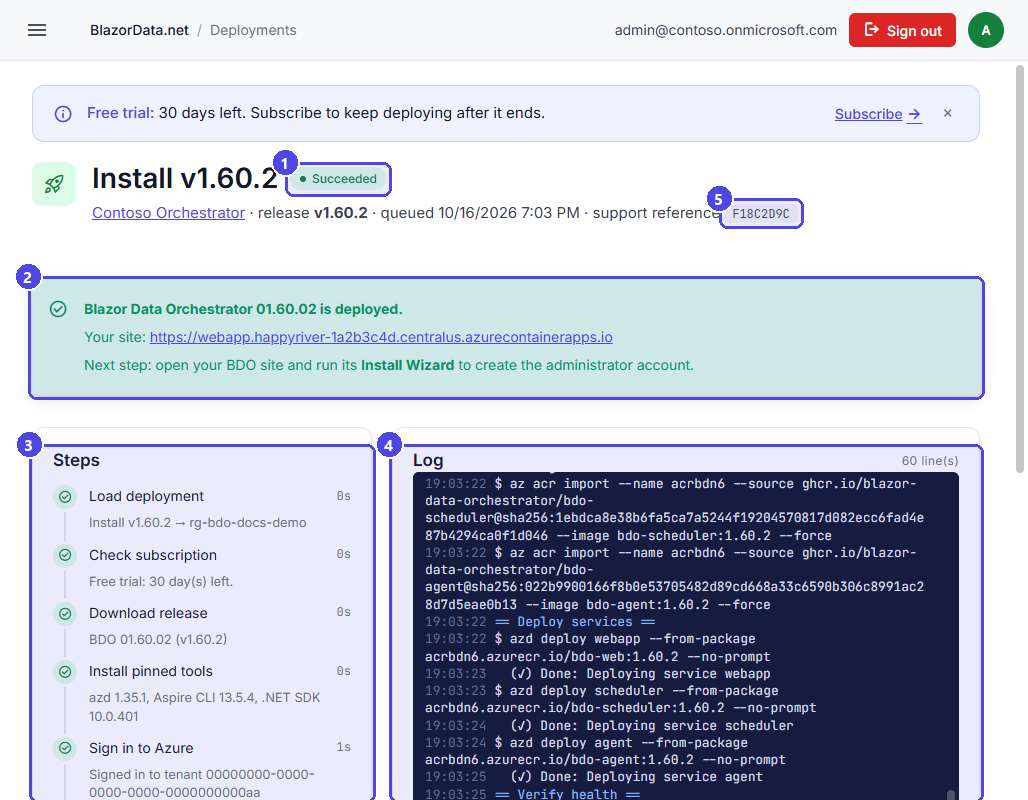
- The deployment's status: Queued, Running, Succeeded, Failed or Canceled.
- On success: your BDO site's address, and the next step, opening it and running BDO's Install Wizard to create the administrator account.
- The deployment steps, with the time each took and a short result.
- The live log of every command, with secrets removed.
- The support reference to quote if you contact support.
If a deployment fails, the page explains the cause in plain words and offers Retry. Resources created before the failure stay in your subscription, and a retry continues with them.
5. Your installation
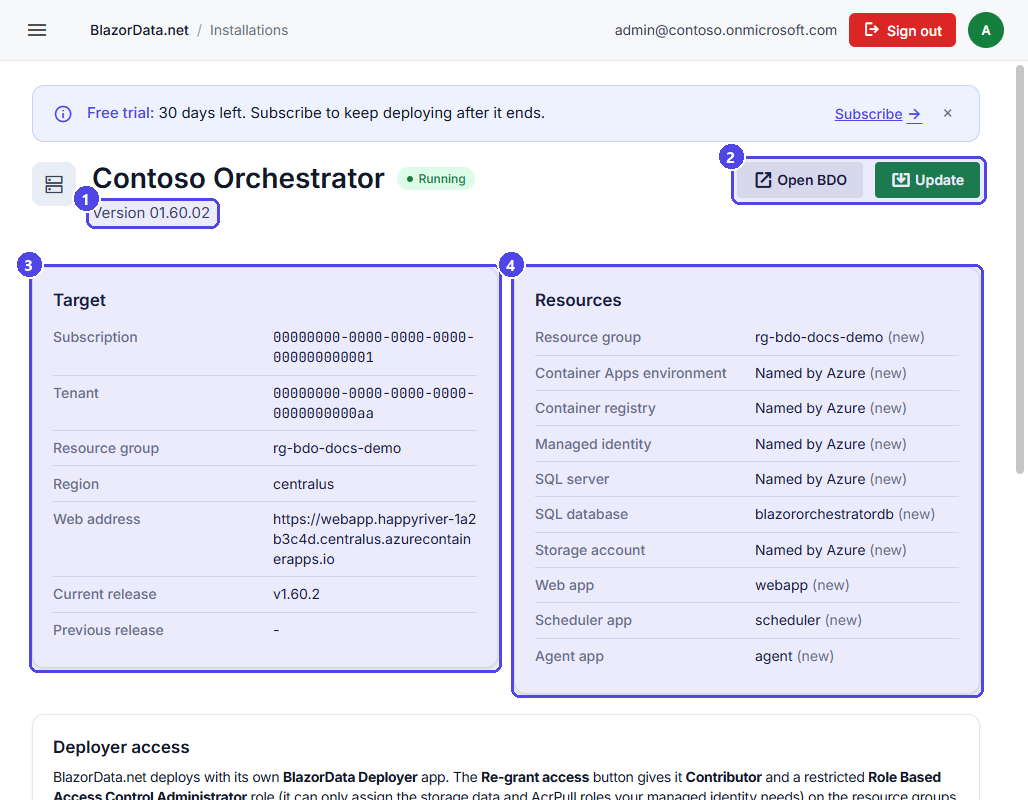
- The BDO version that is installed.
- Open BDO opens your site; Update appears when a newer approved release exists.
- Where it runs: subscription, tenant, resource group, region and web address, with the current and previous release.
- Every resource of the installation, and whether it was created new or already existed.
6. Update to a newer release
From the installation page, click Update.
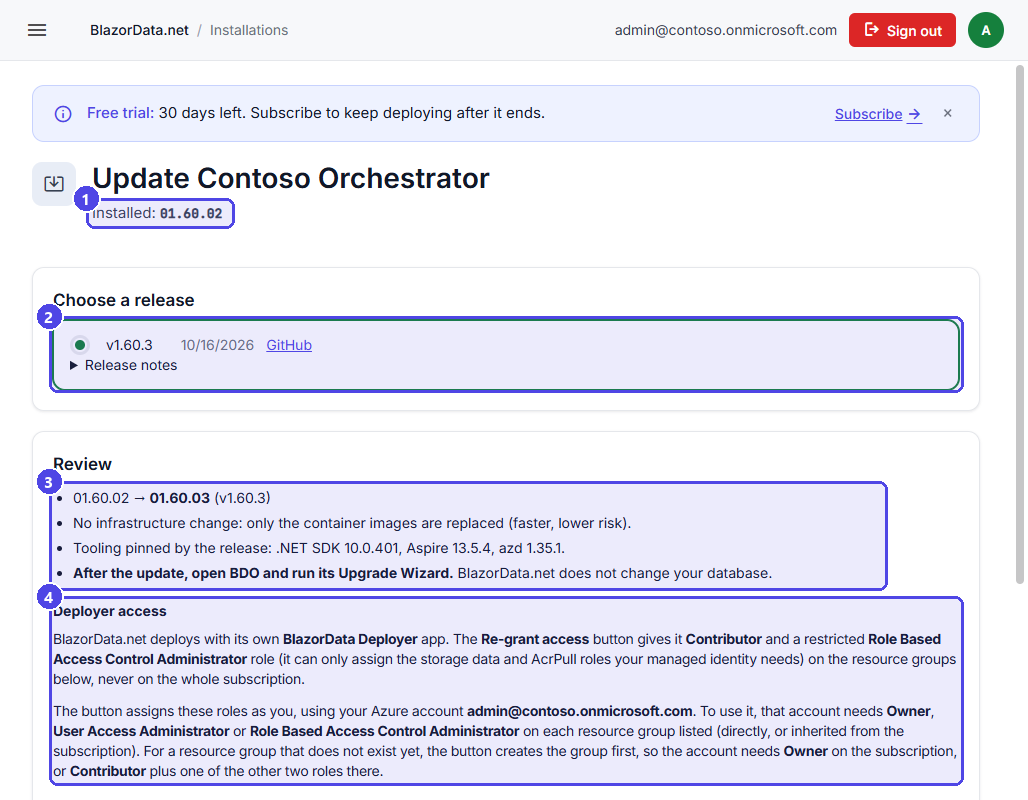
- The version that is installed now.
- The newer approved releases. A release that needs an intermediate update first says so.
- What the update does. Most releases have no infrastructure change, so only the container images are replaced. Afterwards, open BDO and run its Upgrade Wizard; BlazorData.net never changes your database.
- The deployer's access, as in step 12. Grant it again here if you chose to remove it after each deployment.
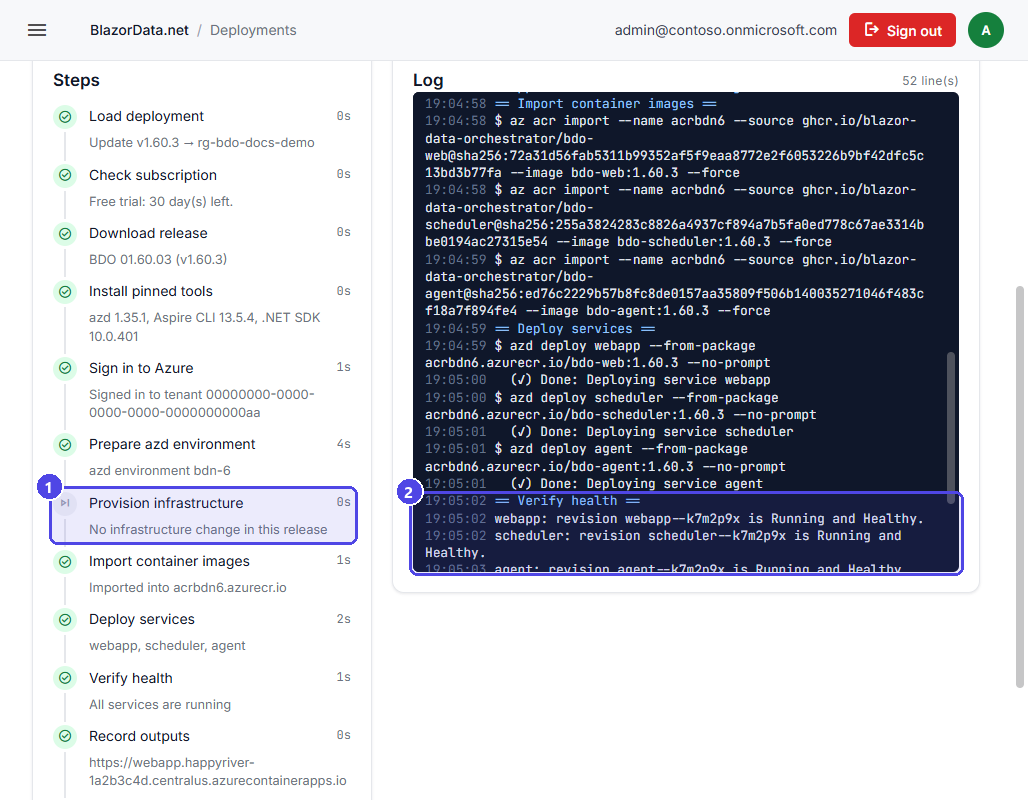
- Provision infrastructure is skipped when the release has no infrastructure change, so the update takes minutes instead of half an hour.
- The health check confirms the web app, scheduler and agent are running the new version.
Then open your BDO site and run its Upgrade Wizard to apply the release's database changes.
For administrators: approving releases
Customers only see BDO releases that an administrator approved.
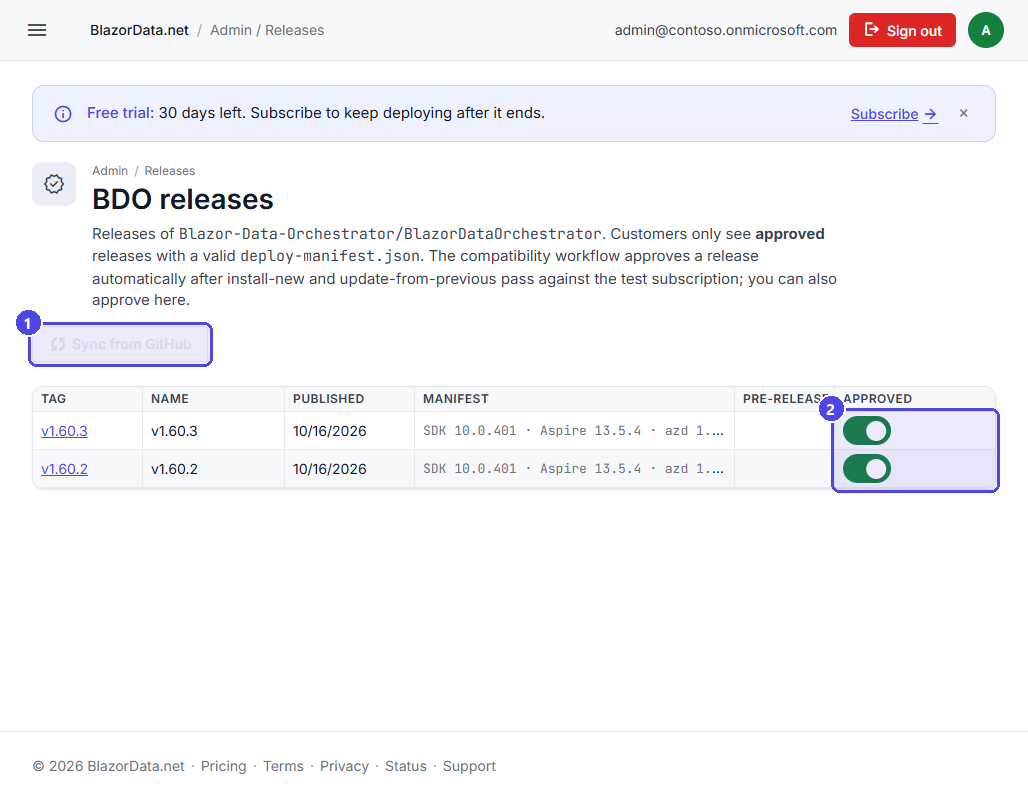
- Sync from GitHub reads new releases of Blazor-Data-Orchestrator/BlazorDataOrchestrator; the list also refreshes on its own.
- The Approved switch offers a release to customers. Approve a release only after an install and an update from the previous release succeeded.
Troubleshooting
| You see | What to do |
|---|---|
| Pre-flight: This subscription cannot create an Azure SQL server in <region> | Go back to step 2 and pick another region, or use an existing SQL server in step 6. |
| Pre-flight or step 12: You need Owner, User Access Administrator or Role Based Access Control Administrator on <group> | Ask an Azure administrator for one of these roles on that resource group, or reconnect Azure with an account that has it. |
| Pre-flight or step 12: You need Owner, or Contributor plus User Access Administrator or Role Based Access Control Administrator, on the subscription to create <group> | The resource group is new, so it must be created first. Ask for Owner on the subscription, or Contributor plus one of the other two roles there. Or have an administrator create the group and choose Use existing in step 2. |
| Pre-flight: This Azure tenant has already used a free trial | Each Azure directory gets one free trial. Subscribe on the Billing page to deploy there. |
| Azure connection does not complete after signing in | The sign-in took more than 15 minutes. Click Connect Azure again. |
| A deployment shows Running but nothing changes | If the deployment worker stops, BlazorData.net marks the deployment Failed after 10 minutes without progress, and Cancel ends it at once after 2 minutes. Then click Retry. |
More on statuses, failure categories and administration is in the Operation guide.